
 EN
 Polski
 Deutsch
 Nederlands
 Français
 Español
 Italiano
 Português
 Română
 Svenska
 Dansk
 العربية
 Čeština
How to Measure Clothes Before Choosing a Kakobuy Size
Use a top that fits you, line up the measuring points and find out what a size label leaves unanswered.
A size letter gives you a starting point. To judge the room and length of a top, measure a similar one you already wear, then compare it with the seller’s measurements for your chosen size. The starting points, units and condition of the garment need to match.
For example, the white Polo zip-up hoodie has an option labelled “L 65–75KG.” That is the seller’s size and body-weight guidance; it does not supply the hoodie’s chest width, body length or sleeve length. The method below helps you identify those missing details. It covers tops, including shirts, sweatshirts and knits.
Choosing bottoms instead? Use the pants and shorts measurement guide for waist, rise, leg length and hem opening.
Choose a top that fits the way you want
Start with a garment of a similar shape and use. For a sweatshirt you plan to wear over a T-shirt, choose a sweatshirt that already feels right over that layer. A close-fitting stretch tee will give you a different starting point from a loose, structured shirt.
- Try on your reference top. Check its chest room, where the hem sits and where the cuffs end. Note any change you actually want, such as a shorter body with the same chest room.
- Take it off and fasten it. Close the buttons or zipper and lay it on a flat surface. Keep the front and back aligned and the sleeves unfolded.
- Smooth, without pulling. Remove folds with your hands, leaving knit fabric and ribbing relaxed. Use a flexible tape, keep it flat and record the units beside every measurement.
If your reference already fits over the layers you intend to wear, its measurements already include that room. Do not add the same layering allowance again. Differences in cut, thickness and stretch still matter; matching a few numbers cannot guarantee the same fit.
Measure chest width and body length
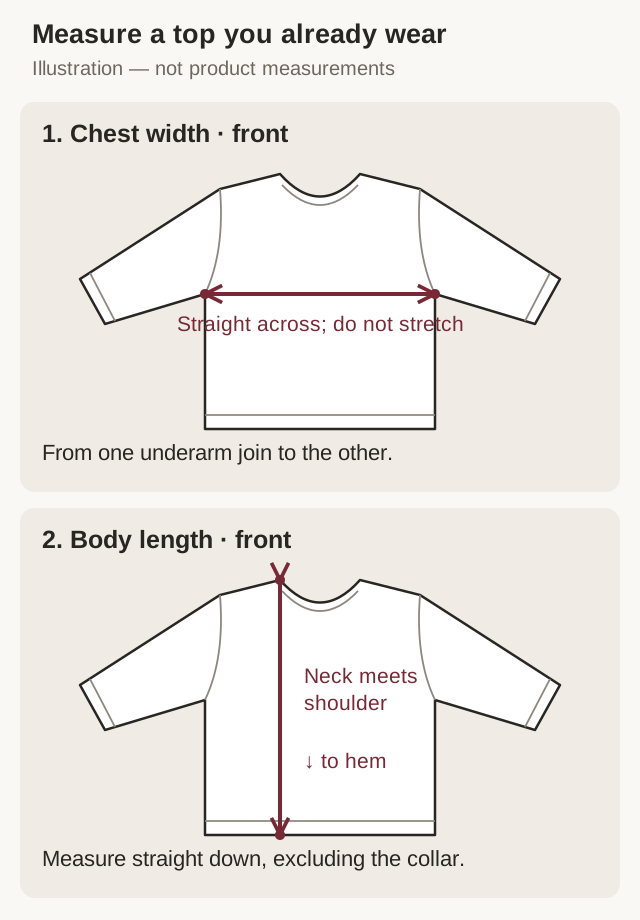
Chest width: underarm to underarm
With the front facing up and closed, locate the two points where the sleeve underarm seams meet the body. Run the tape straight across between them, without following a curve or stretching the fabric. Write this down as flat chest width. If the seller measures a stated distance below the armhole instead, repeat that method on your reference before comparing.
Ask what a chart’s “chest” number means. It may describe this flat width, a garment circumference or a recommended body measurement. For a simple flat top, doubling the width gives an approximate garment circumference. That does not turn it into a recommended body chest size, and it is not a substitute for the seller explaining the chart.
Body length: name the starting point
In the illustration, front length starts where the neckline meets the shoulder seam and runs straight down to the hem directly below. Keep the tape parallel to the middle of the body; do not start at the top of the collar, follow the side seam or measure diagonally to the lowest part of a curved hem.
If the top has a longer back, turn it over and record the back length separately using the same neck-and-shoulder starting point on that side. Some charts instead use the centre-back neckline seam. These methods produce different numbers: ask which one the seller uses, then measure your reference the same way. For a curved or stepped hem, say exactly which endpoint you used.
Check the shoulder and sleeve seams
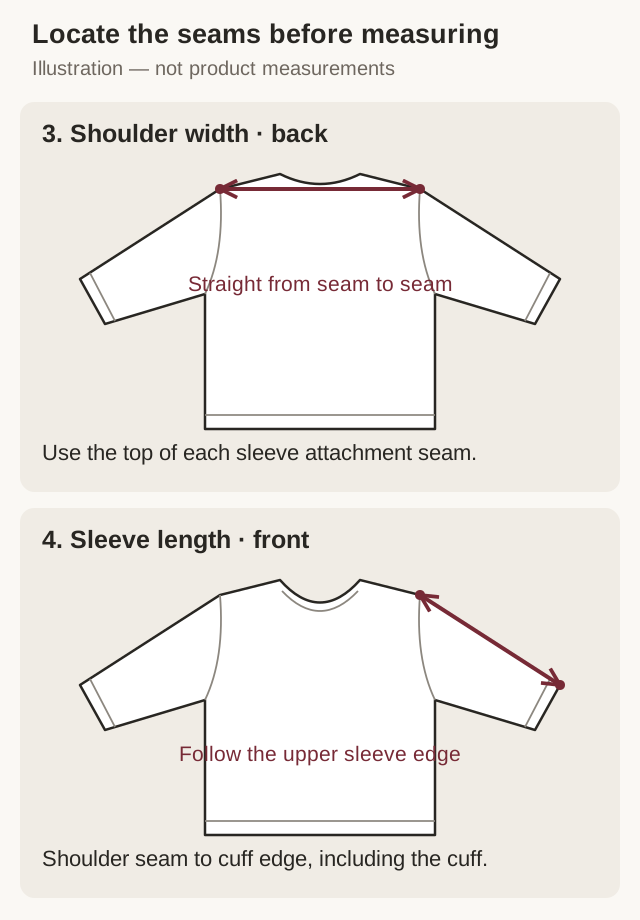
Shoulder width: across the back
Turn the top face down. Find the upper point of each seam where the sleeve joins the body, then measure in a straight line across the back between those points. Keep the garment relaxed; do not follow the neckline around.
A dropped shoulder places that seam farther down the arm. Its wider shoulder measurement and shorter seam-to-cuff sleeve measurement can work together, so do not judge either number on its own. A raglan sleeve has a seam running towards the neckline instead of a conventional shoulder point. Ask for the seller’s diagram or a clearly stated neck-to-cuff method, and use the same construction for your reference where possible.
Sleeve length: shoulder seam to cuff edge
For the sleeve shown, gently spread it along its natural angle. Start at the top of the shoulder seam and follow the upper sleeve edge to the outer end of the cuff, including the cuff itself. Leave the cuff relaxed. Record that complete method beside the number.
A centre-back-neck-to-cuff measurement also includes the distance across part of the shoulder. It cannot be compared directly with the shorter seam-to-cuff measurement. If the chart only says “sleeve,” resolve the starting point before deciding that a size is too short.
Put matching measurements side by side
Use one row for each measurement and keep front and back lengths separate when needed. Check whether the chart describes the garment or the wearer, then use the same unit in both columns. To convert inches to centimetres, multiply by 2.54; converting units does not fix different measuring methods.
Swipe across the table to see every column. With a keyboard, focus the table and use the arrow keys.
| What to record | Your reference | Selected seller size | Check before comparing |
|---|---|---|---|
| Flat chest width | Your measured width + unit | Chart value or “not provided” | Same underarm position; width, not body circumference |
| Front / back length | Record each needed length | Value and stated starting point | Same neckline point and hem endpoint |
| Shoulder width | Seam-to-seam width | Value or measurement diagram | Comparable shoulder construction and straight tape path |
| Sleeve length | Length with method noted | Value with method confirmed | Same start point; cuff included on both |
Once the methods match, look at each difference against how your reference fits. More chest width does not solve a sleeve that is too short; moving up a size may also change the body length and shoulder position. Ask for the adjacent size’s measurements if you need to compare that trade-off. If the seller states a measurement tolerance, keep it with the chart rather than treating a tiny difference as exact.
Work through a comparison before choosing a size
The numbers below are an illustrative exercise. They are not a seller’s chart, measurements of the Polo hoodie or a recommendation for your body. They show how to read a chart once you have confirmed that its units, measuring points and garment construction match your reference.
Swipe across the table to see every column. With a keyboard, focus the table and use the arrow keys.
| Same measuring method | Reference top | Example size A | Example size B |
|---|---|---|---|
| Flat chest width | 54 | 52 | 54 |
| Front length, neck-and-shoulder point to hem | 68 | 68 | 71 |
| Back shoulder width | 46 | 45 | 47 |
| Shoulder-seam-to-cuff sleeve length | 61 | 61 | 63 |
Size A keeps the length, but reduces the chest width
A is 2 cm narrower when laid flat, while its body and sleeve lengths match the reference. If the reference already gives you just enough chest room, the matching length does not resolve that width difference. Compare where the reference feels close when fastened; do not assume a different fabric will stretch enough to compensate.
Size B matches the chest, but changes the proportions
B matches the 54 cm chest width, but its body is 3 cm longer, its shoulders 1 cm wider and its seam-to-cuff sleeves 2 cm longer. If your reference hem is already where you want it, matching the chest alone does not make B the right choice. Shoulder position can also change where the sleeve begins, so read the shoulder and sleeve figures together.
The useful outcome may be “neither matches the proportions I want.” You can ask about another size or choose another cut. You cannot calculate a guaranteed fit from this table, or treat an unstated measurement tolerance as zero. If a very small difference decides your purchase, request the seller’s tolerance and a measurement photo before relying on it.
Check the heading before converting a number
If a chart explicitly gives a garment chest circumference of 108 cm, a flat-width equivalent of about 54 cm can help compare a simple top. A 108 cm body chest recommendation describes a different thing. If the heading only says “chest,” ask which it means before dividing by two. Likewise, matching 68 cm lengths is useful only when both start at the same neckline point.
For a hoodie or cardigan, first try your reference with the layer you expect underneath, then take it off and measure it closed.
Turn a size label into a specific request
If a listing only gives “L” or a body-weight range, save the product link and the exact style, colour and size you are considering. Ask for the measurements that will decide your choice. This request can be adapted to a top with regular shoulder seams:
For the white zip-up style in size L, could you provide the flat chest width between the underarm joins, front length from the neck-and-shoulder seam to the hem, back shoulder width, and shoulder-seam-to-cuff sleeve length including the cuff? Please measure with the zipper closed and the fabric relaxed, in centimetres. If your chart uses different starting points, please show the method.
For a measurement photo, ask for a view that shows the whole tape path, its zero mark and the endpoint clearly. A cropped number, a size tag or a warehouse floor grid is not enough to establish the measurement. Ask about availability and any charge before requesting extra work.
When your own item reaches the warehouse, compare its measurements using the same method before arranging international shipment. If something differs, save the relevant option and measurement photo and contact Kakobuy to ask about the available next steps. Our QC photo guide explains how to read the pictures; the buying guide covers the order process.
Ready to apply the checklist? Return to the Polo Ralph Lauren collection for examples of polos, knits and zip-up styles, then compare the measurements of your exact choice.